As I come to a near completion of this course, I reflect on all of the chances I had to develop a more solid understanding of the International Society for Technology in Education – ISTE Standards for educators. We created many artifacts, whether individually or collaboratively, which demonstrated my learning of these standards. I feel I have had a huge growth spurt with the amount that I have taken in over these past 2 months. I have selected 7 artifacts that you will view below to support my learning.
Here is a great video to get you motivated:
Video: https://www.youtube.com/watch?v=ooTbKEnSpIY
ISTE standards for educators is a great place to get even more information.
Extra: SAMR in 20 seconds video – This will help you understand the SAMR model when I’m explaining about which artifact represents which stage in the SAMR model.
1. Learner
The idea here is to “reach beyond your comfort zone to deepen your practice as you commit to continuous self improvement”. By exploring with new technology practices, working on one’s own or collaboratively, the ultimate goal is to improve student learning.
Artifacts to represent Learner:
- ADST in the Library with Popplet:
ADST for all grades
Link : See more on my ADST Post
2. My Professional Learning Goals. 
Know: Here is my Professional Learning goals presented on Canva platform, and my research summary on ADST curriculum for all ages. To create these artifacts, I had to learn new skills and technologies, as well as a fairly new curriculum and about learning networks. I feel I could have put any artifact into this section considering I was learning as I went along.
I used Popplet to design my summary of the ADST curriculum. Although I have used this a few times before, I have never to this extent. I found it very intuitive and would consider having my students use this when taking notes, planning for writing, as graphic organizer when summarizing a text. However, the learning wasn’t only on the tech tool, but also when understanding the ADST curriculum. Considering I work with all ages, I really wanted to summarize the differences and similarities between each age group and the expectations in this curriculum.
When designing the PLNs, I used Canva, a platform where you can create designs and documents. By using both of these applications, it really allows you to visually display your understanding.
Both of these assignments were designed at the modification stage. I was redesigning the way I shared my knowledge from text into visual platforms.
Do: These artifacts demonstrate learning the ISTE standard Learner, considering I deepened my understanding in both areas. The first artifact explains how I can contribute to implementing the curriculum through Connection, Communication, Collaboration and involving the Community. I feel I have a much greater understanding of how I could help implement the curriculum as a support or lead teacher.
The second artifact had me set personal professional learning goals on the 3 models (SAMR, TPack, ISTE) for integrating technology, as well as the ADST curriculum and personal learning networks. I am a reflective learner as I keep these goals at the forefront and continually try to improve each step along the way, to become more comfortable with each area. I have grown and accomplished so much; however, the doors are just opening.
Understand: The ADST Popplet was one artifact that made me proud to complete. I spent a day reading the curriculum, analyzing the differences in the grades, took notes and can now understand, and better yet, inform others on what each grade entails and areas to focus on etc. My school has many teachers who are not very tech savvy and therefore they would appreciate this Popplet as a good summary to help with their understanding and their planning.
By creating goals, I have given myself something to reach for. I feel as a learner you must always set goals, strive for them, problem solve and reflect along the way. I have been able to develop goals that work for me, challenge me to step outside of my comfort zone and be proud of completing steps that bring me closer to completing them.
2. Collaborator
To work together with others around the globe “to improve practice, discovering and sharing resources and solving problems” (iste.org/StandardsForEducators).
Artifacts to represent Collaborator
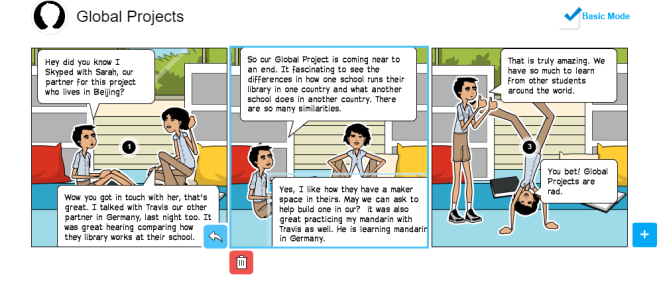
- Comic from Pixton: Global Projects
 https://www.pixton.com/schools/create/comic-strip/ckzuhc4f
2. Canva: How to Read a Web Address

Know: To create these 2 artifacts, I once again had to learn a new platform. I was able to use canva again, so I had a second attempt at this. I used the knowledged that I had gaind from a previous assignment about learning how to use different fonts to make things stand out more. This is why I chose the handwritten font in the blue. Pixton, comic creator was new to me. I find both of these tools easy to use and were ways to augment a task. I could have mentioned both of these ideas in a staff meeting; how to find a website or suggested a website for teachers to use to think about global projects but unstead, I augmented the task, created a voice, added characters (in the comic) to help capture the audience more.
Do: By creating an info graphic to inform others on ways to read websites they could the create their own after researching a few more pointers and they could teach others, whether in step by step directions locally or globally. By using the comic, students and teachers will develop an understanding that the world is at our fingertips; that we can open up our classrooms and be anywhere we would like to be by the click of a button. Virtual field trips and skype in the classroom are also examples of being a collaborator. The website information is at the augmentation stage and the comis is at the Redefinition stage in the SAMR cycle. The latter one is an example of technology that are used to create new tasks that were previously unimaginable.
Understand: I truly understand how important it is as a student learning 21st century skills that we need to open up our own students’ worlds and reach out to connect with others locally and globally. After teaching overseas for years, I see that life is similar in so many ways at school, and if we can visit each others classrooms, we are bringing the world closer. I recognize this; however, teaching in a small city, I see there are many teachers who have not experienced as much technology or worldly experiences. By being a tech leader and collaborator, I will be able to introduce a classroom with no walls; opening up our learning experiences and having no limits.
3. Designer
The idea here is that you are “open to new possibilities so you can create innovative digital environments that engage and support learning”.
Artifact To Represent Designer
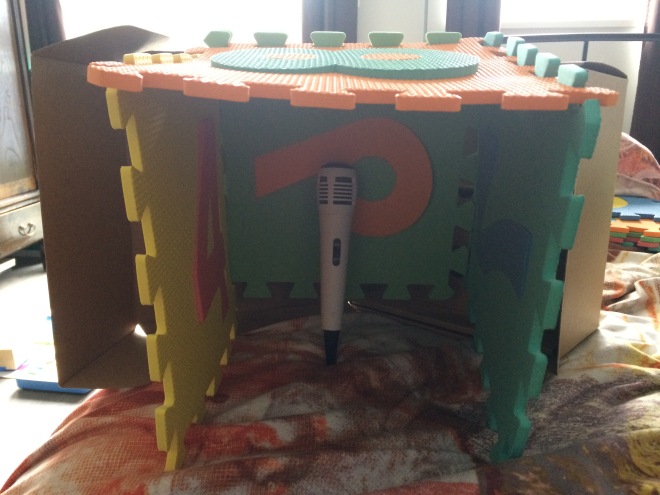
- Sound Machine Design
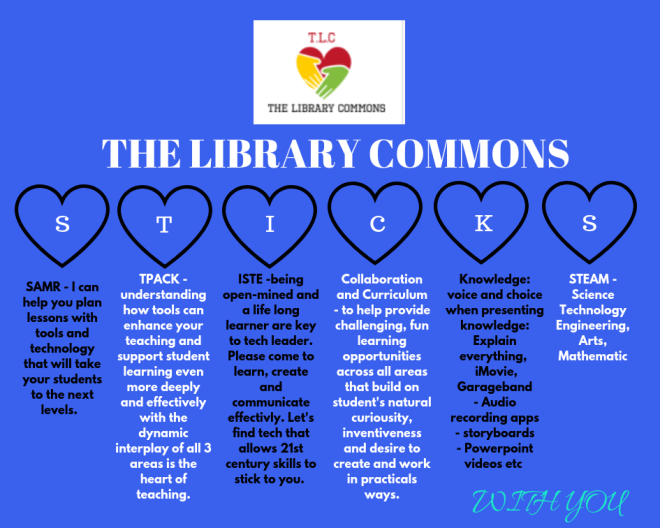
- Logo for The Library Commons, aka TLC.

Know: For this assignment, I needed to know about sound systems, and what microphones were best for the school’s use and budget. In the second artifact, I used a new tool to create a logo. It was fairly simple, came with ideas to do, but I needed to think critically and creatively about what made sense for a new Library commons logo. It took time to scroll through clips that I thought would work best. Once you decide on the graphic, it was easy to add text, change font etc. This was in the redefination stage of the SAMR.
Do: These artifacts demonstrate learning of media arts as well as the connectedness of the library (logo). Students can personalize their own logo, or come up with a logo for a unit that encompasses meaning behind what they have previously learned. To be a designer, you need to use your critical thinking skills as well as your creative thinking skills. I was proud when I saw the alliteration TLC could work.
Understand: The experience of creating these artifacts, and having students do similar activities will have them practicing and increasing their creative and critical thinking skills. We were given an example and then had to design something that summed up our new name for our library, or in the other activity, create something with the knowledge that we had learned from the soundbooth article. This is higher order thinking skills, a much needed skill for 21st century learners. They need to take what they have learned and design something original that encompasses the goal. My goal as a support teacher is to continually have teachers striving to create lessons that integrate these skills and this ISTE standard.
4. Analyst
This is a place where I would have the community evaluate and analyze the changes I have considered and presented for the Redesigned Library commons. We would survey the community and use the data to drive our changes.
Artifact to Represent Analyst
- iMovie: Library Redesign
Knowledge: Wow there was so much learning in putting this artifact together. This artifact is an example of a redefinition stage of the SAMR model for integrating technology. I created this book creator into a movie to demonstrate how our library can be transformed into a place where TLC is in TLC (The Library Commons). I am by no way an entertaining voice when it comes to presenting – but it would be a great place for students to listen, watch and critique to learn how not to present! Assessing on Intonation and presenting skills is what this could also be used for. Skills that you would need to know to complete this is using Google Slides, the app Book Creator and how to download it to a movie and upload it to youtube to share. By presenting the information and sharing it as a movie, you would capture more of an audience. This video could be sent to the school community and feedback could be given by a survey monkey. What do they like? Dislike? What would they change or suggest? How could they help ? All of this could be commented on and sent via email or online.
Do: By sharing this video with the pack, with the students and with the staff, all will start forming their thoughts, opinions and comments to share. You will be open, flexible and hoping for everyone to share these thoughts, opinions and comments. Once you start collecting the data, you will analyze the data, be transparent with the results and begin to start forming a TCL redesigning committee. You will all continue to focus on the goal: seen in the video and ensuring to always reaching for the stars.
Understand: Creating this artifact as well as every other one in Module 5 has been such a grand experience. I love being an analyst. It’s my position as a learning support teacher and future librarian to keep data, analyze the results, see where to go next. I look forward to sending the ideas of the redesigned library out to see what everyone thinks. I feel in the future, my students need to do more redefinition projects, create surveys for peer assessment, reflect and have the data drive the changes. This same goes for instruction. I appreciate my students feedback on my instruction. What do they like, what other would they like to demonstrate their knowledge and their competency. Analyzing, reflecting are so key to 21st century skills that we as teachers need to continually model this, expect this and request this in their practice.
5. Facilitator
This standard is one that many educators need to grab hold of and go for the ride. It is one that allows for more student driven learning. It is about being the model, modelling creative expression, “empowering students to take ownership of their learning and create opportunities for students to innovate and solve problems” (iste.org/StandardsForEducators).
Artifacts to Represent Facilitator
- Inspiration App : STEAM
- 3D Creation
Steam:
3D Design: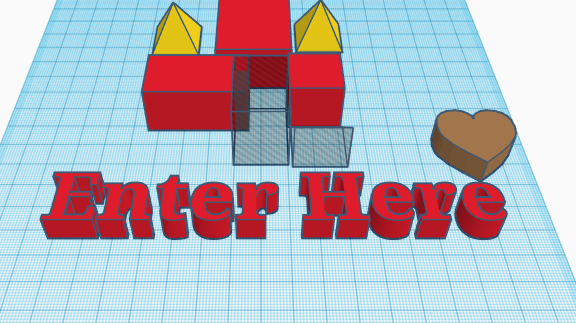
Knowledge: These are great modification stage activities of the SAMR model. Students are expected to create a mindmap or a product on an online platform instead of simply using a written graphic organizer or drawing or an item. This will increase the students motivation and give the students with written output a chance to really show what they know. When making the mindmap, I used a platform that worked for me and adjusted everything to what I needed it. I felt it was very easy to use with little frustration. Colour coding helps organize ideas and would benefit many students who need visual cues to help them focus.
The 3D platform, was a bit tricky and may need more teacher directed help to understand different maneuvers that may be needed. I feel the students could also be experts and this is the control that we have to be able to let go of.
Do: These are great ways to bring in creative expression and also ways to empower students to take ownership of their learning. 3D printing or creating a simple mind map models creative expression. The ideal goal is for teachers to become more comfortable with student driven learning.
Understand: The best way to inform future learning in this area is to actually facilitate it to teachers, to model it to both teachers and students. I have had many teachers very unresponsive to 3D printing: feeling it needs too much teacher time, too much 1:1 time etc. It is a goal of mine to have teachers understand the value in students creating their own 3D models, or trying failing and trying again. We have a 3D printer in my school that has never been used since many are against it. They are afraid to empower the students with something that is so expensive. I have heard comments like “it is just replacing buying little toys, to making them” I think the purpose of using critical thinking skills, problem solving etc. is being missed. I am going to help facilitate this program and get it up and running. It is very hard bringing in new, modern ideas into a staff that often resists changes. I look forward to facilitating workshops that explains why 3D printing, and STEAM ongoing projects in the library are all practices we should be partaking in.
6. Citizen
“Inspire students to contribute responsibly in the digital world and guide them to be curious, wise, empathetic, safe and ethical” (iste.org/StandardsForEducators)
Artifacts that represent Citizen:
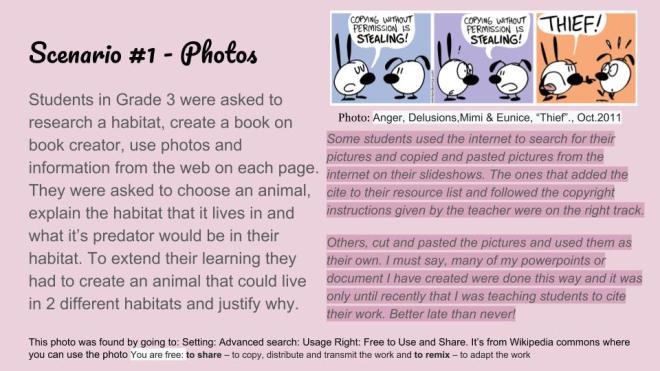
- Google Slides: Scenario Photos

Click here for Artifact #2: Google Doc: Collective Creation
Knowledge: The technology behind this is Google Slides. Students are at the augmentation stage where they replace drawings for pictures, report writing for slides of information. They add colour and presentation skills. Hopefully not too many words so that it isn’t overwhelming.
Do: This learning engagement is to inspire students to “contribute responsibly in the digital world and guide them to be curious, wise, empathetic etc.”
Understand: The goal of 21st century learners is that they are true digital citizens. The skills needed in this platform, google slides is that you need to know how to search for creative commons pics, or information. To find this area you search what you want and use what you get to support the learners.
7. Leader
Building community, have a shared vision, keeping opportunities to support student learning.
Artifacts that Represent Leader:
- Canva: The Library Commons
- The Redesigned Library – repeat, but Leader
- Editing and Compiling Video
- Linoit: A complete summary

Linoit: Please click here to see the version on it’s own website
Know: In order to complete these assignments, I needed to be creative. I repeated the video of the Redesigned library since it will be an artifact that I can share with teachers and admin to see how best we can create a space that matches our goal. This goal is also explained in my Linoit presentation, where I summed up each area of this course: curriculum, environment, media arts, ect. All of these artifacts required developing skills using digital programs. Through the SAMR model I used technology to augment, modify and redefine my tasks.
Do: As you can see I continue to build my capacity as a leader. I really feel I am ready to begin transforming The Library Commons into a space that will accomplish the building plan originally set out:
To design a space that is comfortable, flexible, with areas to work individually and collaboratively, as well as a space to be creative and innovative so students and teachers have a place to research, ideate, read, plan and explore their passions.
Understand: I look forward to continuing to work towards fulfilling this plan as well as further accomplishing my personal Goals set out. This video and other artifacts will serve as a guide to TLC transformation. It will take time. You can take a look at my blog post to see what timeline I have set out for this change to take place. We have a great staff that is working towards a new library policy, transitioning the role of the library from book circulation to being a true Technology Leader. It will be amazing to be apart of this change and building some TLC into TLC to suite the needs of our school and our learners.


 Learning Objectives